A beginner-friendly crochet blanket - The Changing Leaves Blanket - is a free pattern here on the blog! Read on to learn about the design inspiration and all materials needed to create this crochet blanket.
Copyright Disclosure
This pattern is for your own personal use. No unauthorized reproduction, in whole or in part (i.e. copying and pasting this pattern into your own document, altering this pattern in any way and calling it your own, etc.), or distribution of this pattern or content (i.e. sharing this pattern in its whole form on your own blog) is allowed. You can use this blog post in blog round-ups. I give permission to sell your items made from this pattern. Please credit “While They Dream” in your listings. The pattern and all photos are the property of While They Dream. You are welcome to share my patterns across all social media forms as long as you link back to my blog directly.
Inspiration
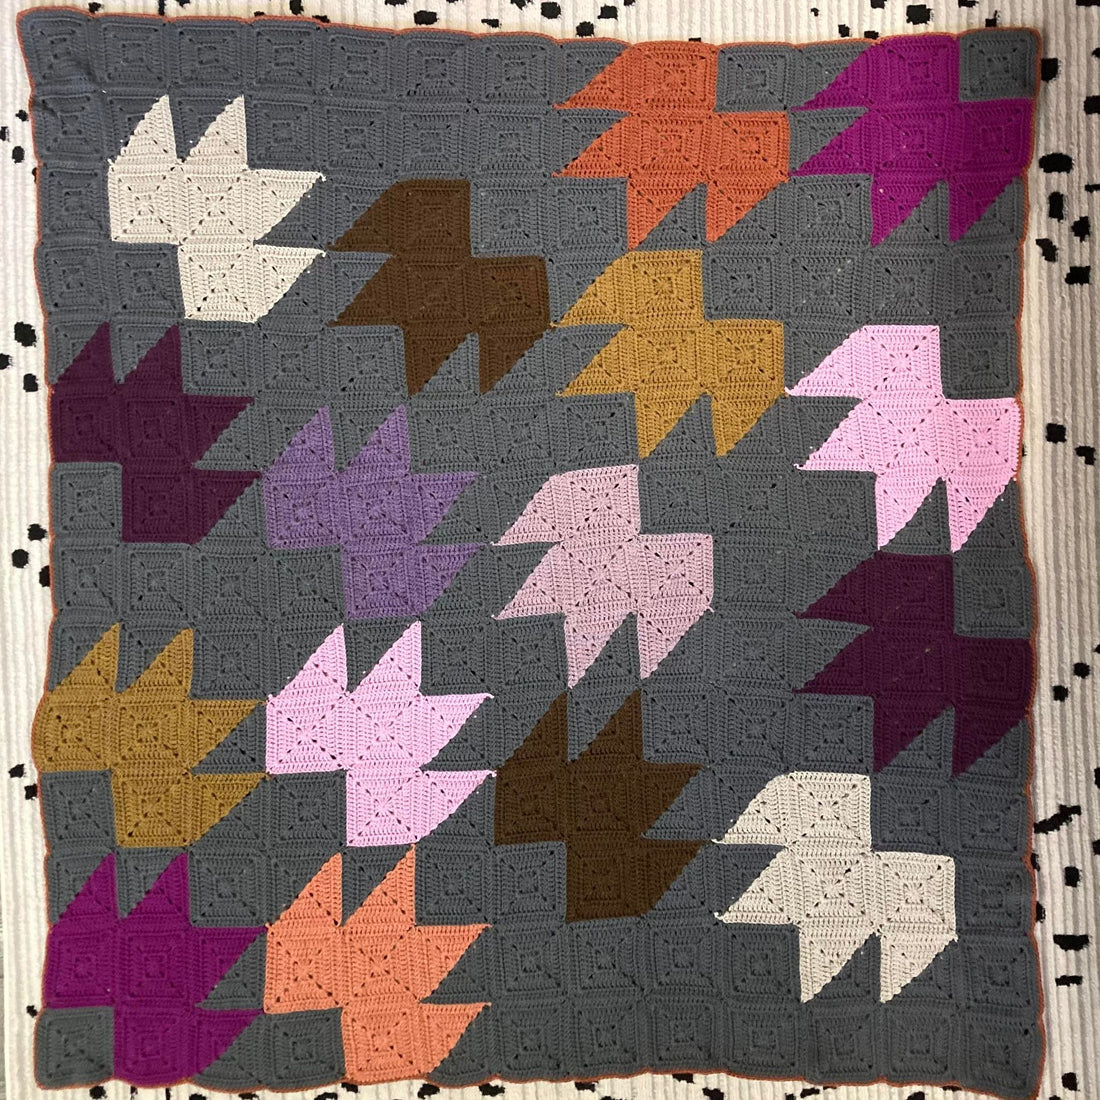
I wanted to create a blanket that represents the changing of the seasons. I was directly inspired by some beautiful quilts I’ve seen, full of colorful leaves. This is the perfect blanket for using up scrap yarn on your leaves!

Final Dimensions: 52 inches wide x 56 inches tall (132 cm x 142 cm) – expect some growth after assembly and use.
Supplies Needed
- Crochet Hook: 5mm/H – adjust your hook size if you adjust the yarn weight. I love using Furls Hooks. They are so comfortable and I don’t get stressed hands or wrists like I once did. Use the code HOOK15 for 15% off.
-
Yarn: Worsted Weight Yarn. I used Berroco Vintage which is 3.5 oz/100g (218 yards/199 meters) – 52% Acrylic/40% Wool/8% Nylon.
- Feel free to make this however you want to. Use any colors, scraps, any weight of yarn, etc. Please note that if you use a different weight other than worsted, the yardage will vary. The best way to figure out how much yardage you would need would be to make one solid colored square and weigh it. I was able to get 12 full squares out of one skein with a small bit leftover.
- For the leaves: You will need approximately 1.5oz/40g used (94 yards/80 meters) to complete one leaf. 3 oz/80g (188 yards/160 meters) for creating two leaves in the same color. I chose to use one color twice on a few leaves. There are 16 leaves in total.
- For the main background color: You will need approximately 31 oz/816g (1,918 yards/1,632 meters). You will make 70 full squares and 32 half and half squares.
- Yarn Colors:
- Main Color: Storm
- Ballet Slipper (made two leaves)
- Chana Del (made two leaves)
- Chocolate (made two leaves)
- Dewberry (made two leaves)
- Stone (made two leaves)
- Dried Plum (made one leaf)
- Grapefruit (made one leaf)
- Lilac (made one leaf)
- Petals (made one leaf)
- Pumpkin (made one leaf)
Stitch Abbreviations
- CC – Contrasting Color
- Ch – Chain
- DC – Double Crochet
- MC – Main color
- Slst – Slip Stitch

Important Notes
- Attaching your squares: Use your favorite method. For this blanket I used the mattress stitch because it gave such a clean look to the backside. I left extra long tails when I fastened off in order to use the tail to mattress stitch. If you choose to use a different method you may find that you use more yarn. There are many ways to go about this if you don’t want to mattress stitch. You could use leftover of any of your leaf colors and single crochet squares together. Hold right sides together and single crochet together on the backside. Mattress stitch seams lay very flat. Single crochet seams will rise up a bit more.
- I attached squares together first to create rows. Then I pinned one row to the next with locking stitch markers and seamed one row to the next.
- There is no wrong way to creating this blanket. You can make squares and attach them as you go along one square at a time or you can make all of the squares you need and do all the seaming at the end. I went back and forth between the two methods.
- Here is a helpful video by “Play Hooky with Me” for how to do an invisible mattress stitch if that’s the route you want to take: How to do an Invisible Join for a Crochet Blanket
- Blocking: I am not blocking my squares as I go, but I did lightly steam block it and lay flat to dry after it was assembled. This will help everything lay nice and flat.
- Border: This part is optional. I added a single crochet border in Grapefruit because it was one of the colors I had the most left of. You could go with the same color as your background. I just wanted a pop of color. Since I only used this color on one leaf, I had plenty to create the border with.
How to Assemble Your Squares

GET THE CHANGING LEAVES BLANKET PATTERN
Get the Changing Leaves Blanket pattern from my shop and save big when you bundle 3 or more patterns. See the codes below.
- You can find the PDF Pattern HERE
- Add this to your Ravelry Favorites: CLICK HERE
- Get the pattern on Etsy: CLICK HERE
- Get the pattern on Love Crafts: CLICK HERE
PATTERN DISCOUNT CODES:
- SAVE10 - Purchase 3+ Patterns and get 10% off
- SAVE15 - Purchase 5+ Patterns and get 15% off
- SAVE20 - Purchase 8+ Patterns and get 20% off

Pattern
Here is a helpful video from “Pattern Princess” to show you how I created my squares: Half Square Triangle Solid Granny Square Pattern
Important Note #1: You need to create your solid crochet granny squares and your half and half crochet granny squares the same way or your squares will look different on the right side.
Important Note #2: Ch 3 at the beginning of rounds counts as a DC.
Important Note #3: Always begin your squares with your Main Color (MC).
Pattern for Half and Half Squares
To begin: With your Main Color, make a Magic Circle (or chain 3, join in a circle).
Round 1: Ch 3, work 2 DC, Ch 2, 3 DC into the magic circle, Ch 1. Pick up your CC by pulling your CC through your Ch 1 of your MC, leaving a tail of your CC to weave in later. This counts as your second chain for this corner space. Also be sure you leave your working CC to the back. Continue working with your CC stitches into the magic circle: *3DC, Ch 2* repeat once more. Join to the top of your beginning Ch 3. If you used a Magic Circle, pull your tail tight to close the hole. (3 DC on each side and one Ch 2 in each corner).
Round 2: Turn your work and slst into the Ch 2 space. (Ch 3, DC) into the Ch 2 space. DC into each stitch across. (2 DC, Ch 2, 2 DC) into the Ch 2 space. DC into each stitch across. 2 DC, Ch 1 in the Ch 2 space. Drop your CC, leaving your working yarn in the front this time. With MC, pull color through the CC ch 1 (this counts as your second chain). 2 DC in the Ch 2 space. DC in each stitch across. (2 DC, Ch 2, 2 DC) in the Ch 2 space. DC in each stitch across. (2 DC, Ch 2) in the Ch 2 space. Join to the top of your beginning Ch 3. (7 DC on each side and one Ch 2 in each corner).
Round 3: Turn your work and slst into the Ch 2 space. (Ch 3, DC) into the Ch 2 space. DC into each stitch across. (2 DC, Ch 2, 2 DC) into the Ch 2 space. DC into each stitch across. (2 DC, Ch 1) in the Ch 2 space. Drop your MC, leaving your working yarn to the back this time. With CC, pull color through the MC ch 1 (this counts as your second chain). 2 DC in the Ch 2 space. DC in each stitch across. (2 DC, Ch 2, 2 DC) in the Ch 2 space. DC in each stitch across. (2 DC, Ch 2) in the Ch 2 space. Join to the top of your beginning Ch 3. (11 DC on each side and one Ch 2 in each corner).
Round 4: Repeat Round 2. (15 DC on each side and one Ch 2 in each corner).
Fasten off each color. Leave a long tail in each color if you are planning on using the mattress stitch. This will allow you to use one of the tails to attach to your adjoining squares. You could also take a good look at the chart to see which color tail to leave long depending on what side you plan to attach to the next. Be sure to orient your half and half square the right way to leave the correct side long.

Pattern for Solid Squares
To begin: With your Main Color, make a Magic Circle (or chain 3, join in a circle).
Round 1: Ch 3, work 2 DC, Ch 2, 3 DC into the magic circle, Ch 2. *3DC, Ch 2* repeat once more. Join to the top of your beginning Ch 3. If you used a Magic Circle, pull your tail tight to close the hole. (3 DC on each side and one Ch 2 in each corner).
Round 2: Turn your work and slst into the Ch 2 space. (Ch 3, DC) into the Ch 2 space. DC into each stitch across. *(2 DC, Ch 2, 2 DC) into the Ch 2 space. DC into each stitch across* repeat two more times. (2 DC, Ch 2) into the Ch 2 space. Join to the top of your beginning Ch 3. (7 DC on each side and one Ch 2 in each corner).
Round 3: Turn your work and slst into the Ch 2 space. (Ch 3, DC) into the Ch 2 space. DC into each stitch across. *(2 DC, Ch 2, 2 DC) into the Ch 2 space. DC into each stitch across* repeat two more times. (2 DC, Ch 2) in the Ch 2 space. Join to the top of your beginning Ch 3. (11 DC on each side and one Ch 2 in each corner).
Round 4: Repeat Round 2. (15 DC on each side and one Ch 2 in each corner).
Fasten off. Leave a long tail if you are planning on using the mattress stitch. This will allow you to use the tail to attach to your adjoining squares.